Showing posts with label recipe. Show all posts

Thursday, April 14, 2011

Carrot Cake

I haven't been really cooking that much lately because of being busy. Wednesday was our last community meeting with Scott County. Our project is finally wrapping up and our final book and products are being put together. They will soon be on the web!

A few photos from the meeting in Scott County:


Paul developed a comprehensive greenway


James studied the Horsey Hundred bicycle trail


Mike looked at a county wide land-use vision


This weekend is going to be pretty eventful. It looks like the weather isn't going to cooperate though, so some of the things we planned may not happen. Brad is coming down for the weekend because of all the things that are going on. I'm sure we'll have a blog post about the weekend! For the occasion, I'm fixing a two layer round cake, which I haven't done before. Since Easter is coming up soon, I decided that it should be a carrot cake. Here is my adapted recipe from Alton Brown's.

If you didn't want to use the round cake pans, I think a 9X13 pan would work well. If you do, you may want to cut the frosting recipe in a third since you will only be frosting the top! It was a little too much frosting as it was!


Mixing the white sugar, brown sugar, eggs, and yogurt


Buttering the pans


Let's hope everyone likes it! 


Final cake!


I have a sugar rush just by making it!


CARROT CAKE WITH CREAM CHEESE FROSTING
CAKE
  • Unsalted butter for greasing the pan
  •  2 1/2 cups, all-purpose flour, plus extra for pan
  • 3/4 cup grated carrots, medium grate, 4-6 medium carrots
  • 1 teaspoon baking powder
  • 1 teaspoon baking soda
  • 1/2 teaspoon ground pumpkin pie spice
  • 1 teaspoon ground cinnamon
  • 1/2 teaspoon nutmeg
  • 1/2 teaspoon salt
  • 1 1/3 cups white sugar
  • 1/4 cup packed light brown sugar
  • 3 large eggs
  • 6 ounces honey Greek yogurt
  • 6 ounces Canola oil
  • Cream Cheese Frosting, recipe follows

CREAM CHEESE FROSTING

8 ounces cream cheese
1/2 stick unsalted butter, room temperature
1 teaspoon vanilla extract
2 cups powdered sugar
Add all ingredients into a bowl and mix together until smooth.  
Place the frosting in the refrigerator for 5 to 10 minutes before using.
Makes about 2 cups

DIRECTIONS

Butter and flour two 9-inch round cake pans. Line the bottom with parchment paper. Set aside.
Grate the carrots and set aside.
Whisk the flour, baking powder, baking soda, spices, and salt in a bowl. 
Add the grated carrots and toss until they are well-coated with the flour.
In another bowl, combine the sugar, brown sugar, eggs, and yogurt.
While mixing, drizzle in the oil. 
Add a third of the flour mix at a time to the wet mixture and fold in until just combined. 
Pour half into each of the cake pans and bake for 16-20 minutes.
Remove the pan from the oven and allow cake to cool 15 minutes in the pan. 
After 15 minutes, turn the cake out onto a rack and allow cake to cool completely. 
To Frost:
Frost with cream cheese frosting after cake has cooled completely.
Frost only the top of one cake layer
Top with finely crushed toasted walnuts
Add second layer, then continue top and sides

Sunday, April 10, 2011

Tuna, Asparagus, and Waffle Fries

Tuna with Asparagus and French Fries

Tonight's cuisine was a specialty of the the Library Bar & Grill, a local restaurant here in Madison. I frequent this bar a few times a semester to grab some happy hour drinks and food. Since my transition to pescitarian in the middle of last year, I have been a sucker for this Tuna Sandwich which is covered with a spicy sauce and fresh veggies the dish can also be served with a variety of side dishes and I almost always choose the cajun fries, french fries dusted with a spicier seasoning salt mixture. It is fairly simple to cook and only takes about 45 minutes total which includes marinating the tuna. I like to combine this with some seasoned fries and baked garlic asparagus.

Tuna Sandwich:
2 - 6oz Tuna Steaks
5 tablespoons olive oil
1 tablespoon lemon juice
Salt & Pepper to taste
2 Cloves Garlic (pressed)
Slice of Tomato, cucumber and lettuce or spinach

Sauce:
1 Tablespoon Mayonnaise
1 Teaspoon Chili Powder

Directions:
Mix the Olive Oil, Lemon Juice, Garlic, Salt and Pepper together. Pour over Tuna Steaks in a shallow dish, cover, and refrigerate for 30 minutes. Combine Mayonnaise and Chili Powder and refrigerate. Grill Tuna for about 4 - 5 minutes on medium high heat, turning once. The inside should be a pale pink, fading to white toward the surface. Place on your favorite hamburger bun and top with sauce and vegetables.

Baked Asparagus with Garlic:
1 lb of fresh Asparagus
1 -2 Tablespoons of Olive Oil
Salt
3 -4 Cloves of Garlic Coarsely Chopped

Directions:
Wash Asparagus. Cut off rough ends. Place in 9" x 13" baking dish. Cover in Olive Oil and Salt. Toss to coat evenly. Mix in chopped Garlic. Bake at 400 degrees for 8 - 10 minutes or until lightly tender. I prefer my asparagus with a bit of crunch left in it. You may cook longer if you prefer it that way more tender. However, I would probably cover it if leaving in the oven for more than 15 minutes to prevent burning.

French Fries:
The french fries were my favorite frozen type and prepared per the package instructions then dusted with seasoning salt. I hope to try some homemade french fries or sweet potato fries with this dish the next time I prepare it.

Monday, February 28, 2011

Forget Girl Scout Cookies...Meyer Lemon Shortbread Cookies


Meyer Lemons

Lately I've been on a fresh food kick, making juices, and eating lots of vegetables and fruits. I guess this is the effect of using the juicer Brad's mom got me for Christmas, how good fresh foods make me feel from the detox diet, and how good fresh OJ tastes.


I've seen some recipes on the blogs I read for Meyer lemons. I hadn't heard of them, but evidently they're sweeter than normal lemons and are grown in California. I found some at the grocery one weekend and decided to give them a try. After noticing one of them went bad today, I decided I needed to do something with them!

So I took the zest of the lemon and made Meyer Lemon Shortbread Cookies, and made lemonade from the juice. The cookies come from the Tiny Urban Kitchen blog. They don't really taste like lemon, but are very sweet, and remind me of Girl Scout cookies! No need to pay $3.50 a box anymore!


Look at all that lemon, sugar, and butter


Sunday, February 13, 2011

Valentines Pt.2

On Sunday Brad and I wanted to partake in cooking chili which we can have to eat during the week. Brad has made chili often, and I've attempted it once. It did not turn out so well then. But this time I was prepared, I found a cool recipe from The Kitchn blog, and had the awesome La Chamba cookware my mom got me for Christmas. When you cook tomato in the La Chamba, it's supposed to sweeten the sauce because of the reaction between the acidity of the tomato and alkaline of the clay pot. It is interesting how these pots are made. They are handmade in Columbia. They turn black after they are rubbed with a type of stone which smooths the clay out.


Saute the vegetables (1 medium yellow onion, 1 green pepper, 1 red pepper, 2 carrots, 2 celery stalks, gloves of garlic)


I first had to season my La Chamba by filling it with 3/4 water, and cooking it at 400 degrees for 30 minutes. This seals the pores in the clay. I let it set out and cool while I cooked the vegetables. I then added my roasted canned tomatoes, tomato sauce, 1 tbs chili powder, 1 tbs cumin, and 1 bay leaf. Then I added the cooked vegetables.


I let the chili cook for 1:30 minutes. I then added 1 cup corn and a can of kidney beans and let it cook for 20 more minutes. This lets them get warm without turning mushy. It smelled great!


The chili turned out awesome and it will be made again! I only omitted the meat and some spices (only 1 tbs of cumin and chili, and no coriander or cayenne). I liked this chili because it is thick and not thin like I made it before. I hadn't thought of putting tomato sauce in it. But I'm partial to Cincinnati chili, so I made spaghetti noodles to go with it. I am super excited to have it throughout the week.

I enjoyed cooking the chili with Brad and am interested to see how his turned out! I can't wait to enjoy the wine my mom got us for Valentine's Day this coming spring break! Thank you mama! This Californian winery has some nice red wine, Menage a Trois Wines. If you see it, I'd definitely try it out!


My chili was a version found in Cooking Light's Way to Cook Vegetarian (pg. 404 for those who own it). It was an incredible mix of roasted bell peppers, tomatoes, butternut squash, and beans. It was a time consuming process, but after I had all the ingredients ready it went quite fast and all I had to do was let it simmer for about an hour and it was golden.


First you roast, peel and dice the peppers. Cook the onion in olive oil in a large pot over medium-low heat until it starts to brown. Add spices of your choosing, I used cumin, paprika, chili powder, and a blend of my very own dried chilies and habenaro peppers with about 6 cloves of pressed garlic. After this cooks for a bit then you add the peppers, some vegetable broth, a lot of squash and crushed tomatoes. Simmer for about 20 minutes. Add beans of your choice (i.e. pintos, kidney, great northern, cannellini, etc.) Cook for about 30 - 40 minutes until it thickens and then sprinkle with some green onions for additional flavor. You can garnish this with some sour cream or cheese. I even used some leftover dill sauce from the day before.

Another cool thing I did this evening was can the chili. Katrina bought a very cool book for me over the holidays, and I have been itching to try it out! It is called PreserveIt and teaches the fundamentals of canning and preserving foods. I also got a hold of Ball's Home Canning Guide and my grandmother's pressure cooker. After I did a test run on the cooker, I put it to work. I was able to can about 7 pints of the chili goodness and with any luck it will keep so I can share it with the world. I'll let it sit around for a few weeks and then give it a test. I would also use a word of caution for those starting out the canning process - it can be extremely DANGEROUS and should be done under a very watchful eye!


Earlier in the day, I also prepared some of Katrina's famous cinnamon rolls. Unfortunately, I cannot mention an ingredient of the recipe without some harsh consequences (I almost had to leave cinnamon out of the title, but Katrina's famous rolls just didn't have that ring to it!). With that being said, they sure are a treat. Despite the hard labor and patience it takes to knead dough and wait for these scrumptious delights, it is well worth it. Maybe some day, I can reveal this top secret extravaganza to the world and you can divulge in such splendor!

Friday, February 11, 2011

Valentines Pt.1

This Valentines weekend Brad and I decided we wanted to try a couple new dishes that invigorated our taste buds. For Saturday evening we made one of our favorite dishes for our Valentines dinner. We cooked up some salmon with a dill sour cream dressing, roasted chili potatoes, and for me a salad, and for Brad, asparagus.

From the grocery I picked up a salmon steak. I was glad to learn from Brad that the only difference is the way the salmon is cut. I thought the salmon was fine cut this way. Even though there more bones, they were easy to separate from the fish as well as the skin. Plus, I wanted the Canadian farm raised salmon instead of the Chilean, just because I thought it would be fresher since it would come from a shorter distance.


Look at all those wonderful Omega 3s!


I learned this recipe from my mom. Just slice some potatoes, glaze with a mix of olive oil, chili powder and salt. They don't turn out spicy, so a lot of chili powder goes well. Just roast them on 350 uncovered until they're browned.


Brad sent me this gorgeous necklace. I absolutely love it...and Brad! He found it from an Etsy shop I had on my favorites, 3 dots. She has some amazing jewelry. I love how the rustic wood mixes with the modern shapes and the elegance of the way it is put on the necklace.


I love the one he picked out!


Now back to the salmon. I put a layer of mayonnaise, lemon juice, salt and pepper for the marinade. This combination is acidic, so it tenders the fish well. I let it sit in the refrigerator for a couple of hours. Then I wrapped it in foil, making it into a packet so the fish would steam. This piece was a 3/4lb steak, so I baked it at 350 for 40 minutes while the potatoes cooked. It's really super easy to prepare, really healthy and not that expensive (the fish was $6.30 and it made two generous portions). I think I'll do this more often!


As I was cooking I looked out and the sky had turned this great hot pink. We've had some quite different weather lately with a lot of wind, and some pretty skies like this!


For the dressing for the salmon, mix some sour cream with lots of dill and some lemon juice. Let it sit in the fridge for a while so it will marinate the sour cream. It's best to do this as early as possible in the process of dinner.


I followed a process similar to Katrina's for dinner. I had salmon fillets and used a combination of olive oil, parsley, oregano, salt, and pepper to marinate it for about 2 hours. I then put it in some aluminum foil and topped it with sliced lemons and baked it for about 35 minutes at 350. Once it was finished I topped it off with a sour cream dill sauce. I also did the potatoes with chili powder and some asparagus roasted in olive oil and pressed garlic. I also enjoyed the dinner with a bottle of my favorite cheap white wine to not overpower the fish. Broke Ass Wine goes for about $6 a bottle and is very good for the price!

Katrina got me a new Fossil wallet and an amazing vintage coffee mug. Even though I am slimming my caffeine intake these days, I still enjoy a heaping cup of the brew early in the morning. She also sent along some of my favorite chocolates from Old Kentucky Candies in Lexington, KY. I am a sucker for chocolate suckers!

On Friday, we caught a couple of Netflix. We watched "A Sailor Who Fell From Grace with the Sea", which was made in 1976 and based on a novel. It's horrible, don't watch it. Especially if you like cats and Kris Kristofferson.

After that we watched "The Gates" which was a documentary about a temporary art project installed in Central Park in 2005 by two French artists. It was pretty neat. Brad says he remembers ASLA (American Society of Landscape Architects) writing an article about it. It was a large controversy, but created a lot of enthusiasm once it was actually installed around 30 years later.

Tonight we were looking for something a bit lighter and romantic. I chose the I.Q. which stars Tim Robbins, Meg Ryan, and Walter Matthau (He plays a wonderful Albert Einstein). It was a very interesting, and yes, romantic comedy! I don't understand why this movie flopped so bad??

After that, we were feeling more movie, so I had Katrina pick out any film she wanted. She chose Journey into Amazing Caves: IMAX. It has very great images of caves and exploring, but lacked a huge part of verbal pizazz. Once again, we were feeling like spending more time together so we watched yet another movie. I chose Ira & Abby, which is a very different movie about love and life. It is a little neurotic in places, but overall a wonderful film. I would urge you to check this out if you are into quirky romance films...

It was a really great night and I can't wait to see Brad over spring break! Which is only a month away.

It was a very great evening. Although we didn't get to actually see one another face to face, Skype and the movies sufficed. We are saving our trips for a journey up to Minneapolis to check out the city and do some sight seeing. I am very much looking forward to spring break!

Tuesday, February 8, 2011

Lemon Cheese Tart

I love modern...so that's probably why this book "The Modern Baker" caught my eye at the library. This book has some great recipes, and it's divided between cakes, cookies, breads, and non-sweet main course dishes. There is a smoked salmon/puff pastry/cream cheese and chive dish that looks good too...and the banana rum coconut cake...and.......did I mention the key lime cookies?


Maybe I chose this recipe to make because I want warmer weather to be here, and lemons remind me of lemonade and summer. I don't have a tart pan, so I made it in a regular pie dish and it turned out just fine. I think this would be something good to take to a potluck since it's a different type of dessert, but still rich enough for the sweet tooth.


I've already returned the book the library, so I will write out what I remember!

Sweet Tart Crust
1 1/2 cups flour
1/2 cup sugar
1 egg
1 egg yolk
1 tsp baking powder
1 tsp salt
3/4 stick cold butter


Whisk flour, salt and baking powder together. Cut the cold butter into 8 pieces and add to mixture. Pinch the butter into the flour until it is all broken up and mixed in. Add in the sugar and one egg, mix. Then add other egg, mix. Keep folding it over until it begins to stick together enough to take out and form a ball. Because of the sugar content, the dough can be kneaded about 15 times to make it form nicely. Roll out into a circle 1" larger than the pie/tart pan, about 1/2" thick. Roll mostly from the center out with each pass, trying not to touch the edges too much. Grease the pan and lay dough over, then form the edge to look nice.

Lemon Filling
16 oz cream cheese room temperature (I used one regular, and one with 1/3 fat)
1 tsp vanilla
1/2 cup sugar
2 eggs (I only used 1 egg because I didn't want to use up all my eggs, and it was fine)
2 egg yolks (I also only used 1 egg yolk)
1 cup sour cream (low fat kind here!)
2 tsp lemon zest (I'm going to add more next time for more lemon)


Make sure cream cheese is room temp. It will take a few hours to do so. Add cream cheese to mixing bowl with sugar until soft and blended. Add vanilla and lemon zest, mix. Add one egg at a time, mixing after each one. Add sour cream, mix. Fill tart/pie pan with the lemon filling.Set oven rack on the lowest position and pre-heat oven at 325 degrees. Bake 30 minutes. While the tart is cooking, make the glaze.

Glaze
1 cup sour cream
1 tsp vanilla
1/4 cup sugar

After the tart has cooked 30 minutes, add the glaze on top and cook an additional 10 minutes. If you want to get fancy, adding some lemon slices or some more zest would look nice.


If you are using a pie pan (like I did), cook longer (mine took an additional 20 minutes because the pie pan makes the dessert thicker than a tart pan.) It may still 'wiggle' but it will set once it cools. Don't worry if the lemon filling looks like it is going to spill over, it will lower and set once it has cooled too. I figured mine was done once the lemon filling was beginning to brown and crack at the top edge.

Sunday, February 6, 2011

Mushroom & Pepper Tart w/ Blueberry Cobbler

Tonight, I pulled out a new cook book and tried a variation of tart that turned out amazing. The book is called Cooking Light Way to Cook Vegetarian. The book is an amazing adventure into the world of vegetarian cooking. It features several desserts, appetizers, breads, and entrees that will make anyone's mouth water. It also has plenty of photographs and gives several tips that help make cooking much simpler. The recipes are very diverse and use high quality ingredients. I would recommend picking up a copy if you are into cooking!

Ingredients
Pie Crust:
1 1/4 cups of All-Purpose Flour
1/4 TSP Salt
1/4 TSP Baking Powder
2 TBS minced Chives
1/4 cup Vegetable Shortening
4 TSP Unsalted Butter, melted
Cooking Spray
1 TBS Dijon Mustard

Filling:
1/2 cup Dried Porchini Mushrooms
1 TBS Canola Oil
2 TBS chopped Shallots
4 OZ Cremini Mushrooms, sliced thin
3 OZ Shiitake Mushroom Caps, sliced thin
1 Clove Garlic, pressed or minced
1 TSP chopped Tyme
1 TBS chopped Parsley
3 TBS grated Parmigiano- Reggiano Cheese
1/2 cup 2% Reduced Fat Evaporated Milk
2 Large Eggs
1/2 cup chopped bottled Roasted Red Bell Peppers

Directions

To make the crust, mix the dry ingredients in a large mixing bowl. Cut in shortening until it resembles coarse meal. Mix butter and boiling water. Make a well in center of the flour mixture and pour butter mixture in the well. Gently draw flour into the butter mixture until clumps form. Press dough into a small ball and refrigerate for 30 minutes.

Preheat the oven to 400°

Roll the dough out to fill a pie or tart pan. Coat the pie pan with cooking spray and press dough into the bottom and up the sides of the pan. Fold any excess dough inward. Pierce the bottom and sides of the dough and line the bottom with aluminum foil and weigh down with pie weights. Bake at 400° for about 25 minutes or until lightly browned. Cool for about 15 min and brush the crust with mustard.

Reduce oven temperature to 375°.

Prepare dried mushrooms per directions; save 1/4 cup of liquid for cooking. Heat oil in a large skillet over medium heat. Add shallots and garlic; cook 1 minute. Add cremini and shiitake mushrooms; cook 8 minutes, stirring occasionally. Stir in porchini mushrooms, tyme; cook for 3 minutes. Stir in parsley lemon juice, pepper, and salt.

Pour mushroom mixture evenly over the tart crust. Combine 2 TBS of cheese with milk and eggs, stir with a whisk. Pour over the mushroom mixture in the tart crust. Sprinkle with chopped peppers and remaining cheese. Bake at 375 for 35 minutes or until it is set. Cool for 10 minutes and garnish with chives or parsley. The dish goes extremely well with southern style cole slaw.


The Mushroom and Roasted Pepper Tart requires some time to make, but they are a delicious treat. This dish has reinvigorated my love of cooking and I plan to walk through the book one recipe at a time until I'm either overweight or satisfied.

I was a bit inspired by Katrina to attempt a simple cobbler recipe with some frozen fruit Katrina and I picked this summer in the Apostle Islands. It is extremely simple and equally tasty. The recipe I used can be found at MyRecipes.com. I simplified the ingredients list a bit.

Ingredients
Filling:
6 cups fresh blueberries
1/3 cup sugar

Topping:
1 1/3 cups all-purpose flour
2 TBS sugar
3/4 TSP baking powder
1/4 TSP salt
1/4 TSP baking soda
5 TBS chilled butter, cut into small pieces
1 cup fat-free sour cream
3 TBS 2% reduced-fat milk
1 TSP sugar

Directions

Preheat oven to 350°.

To prepare filling, combine first 2 ingredients in an 11 x 7-inch baking dish.

To prepare topping, lightly spoon flour into dry measuring cups; level with a knife. Combine flour and next 4 ingredients (flour through baking soda) in a large bowl, stirring with a whisk. Cut in butter with a pastry blender or 2 knives until mixture resembles coarse meal. Stir in sour cream to form a soft dough.

Drop dough by spoonfuls onto blueberry filling to form 8 dumplings. Brush dumplings with milk; sprinkle with 1 teaspoon sugar. Place baking dish on a jelly roll pan. Bake at 350° for 50 minutes or until filling is bubbly and dumplings are lightly browned. Serve with ice cream or whipping cream and coffee.

Cooking Night

Another cooking night between Boo and I. Tonight I made the tomato tart again. It was good, but it wasn't as good as the one I made before, but how can I compare to a real garden tomato and fresh mozzarella? Tonight I had a special variety of tomato, but it just wasn't like the garden tomato. I also recommend using chunks of cheese or shred your own. I've found that pre-shredded cheese of any kind really looses a lot of its taste because it dries out. However, it was still good and the mustard really adds the flavor to this dish.


Mine didn't exactly look like this. All I would need is a tart pan and fresh basil though!


After the tomato tart, I wanted some dessert. So I decided to make a single serve fruit cobbler that I've made a few times before. I kind of just made this up. I basically put whatever fruit I want in the bottom of a baking dish. Frozen fruits work well for some reason, I think it's because of the water content. Then I add a spoonful of sugar on top and let them sit while I'm making the crust. You can make any amount you like for the crust, just remember the 1,1,1 rule, give or take. 1 tbs melted butter, 1 heaping spoonful of flour, and 1 spoonful of sugar. I usually use 3 to go over a small ramekin dish. Then just bake at 350 until bubbly and brown, about 30/40 minutes. It's usually best to bake it while cooking something else since it takes so long.


Earlier this week I sent out Brad's Valentine's present. I hope he likes it!


 I also spent some time taking some photos on manual settings. I like these type of shots where the car lights are shown like this, but the road is too well lit and the effect doesn't work as well. Just experimenting!


Brad made a totally different type of tart. It seems like it turned out well from what he says! He decided to make a blueberry cobbler after he saw my peach raspberry one!

Saturday, January 29, 2011

Fish Tacos

Brad first introduced me to fish tacos while we went camping at the Red River Gorge with Stoss and Jenna. At first I was really skeptical; especially with the tuna. However, the fish tacos turned out really good, even though they only consisted of flour tortillas, tuna, cheese, and chi chi's salsa. I can't remember the next time I had fish tacos, but ever since then I've been a follower and they've become one of Brad's and my favorite dishes.

We recently had some pretty awesome fish tacos when we visited Chase in Atlanta. They both had the 'pink taco' which was a pink flour tortilla with salmon and pink cabbage. I had a basic cod fish taco, which was great also. Last week we saw that Chase had  his hand at some homemade fish tacos, and they looked great. So Brad and I wanted to join in on the fun too and make this dish, which we've for some reason never made before!

Each of us made different types of fish tacos. I used shrimp instead of the more common, but just as great, white fish. You really can't go wrong with any fish taco, and you can make them anyway you want to. I shredded some mixed greens on a flour tortilla, added some chopped tomato and red onion, sliced avocado, the cooked shrimp (I got pre-cooked kind, then sauteed it some in butter), and then topped it off with lime juice. It was great! They tasted really fresh. Next time I'd like to make some spicier salsa.


Being a lover of the typical fish taco, I opted for a cod variation of a recipe found at Tiny Urban Kitchen's Blog. It was a wonderful treat and a bit of a break from the cold Wisconsin climate. I even made the home made Pico de Gallo, the creamy chili sauce and sliced up some avocado to go with it! I must say that this was an incredible dish. Everything goes well together and there are lots of leftover goodies to use throughout the week.

Much like the Tiny Urban Kitchen, I have little room to spare. Besides that, it is the depth of winter here which makes grilling outside a nightmare. So I had to use my trusty George Foreman grill on this one. Yes, that is a Corona next to it and, I must admit, a light beer goes well with this light dish!


The finished result was a heaping mess of a taco, but it was REALLY good. This has definitely made it onto my permanent roster of dishes and I will continue to perfect it and try various kinds of fish.


Saturday, January 22, 2011

Apple Latkes


I made these apple latkes several days ago and they're really good and pretty easy too! I didn't get a photo when I made them, so I added a link from the Smitten Kitchen, a good cooking blog! I used Nigella Lawson's recipe I found in a magazine, but both are about the same. The apple latkes diminish in taste after a couple of days, so either eat them all or split the recipe in half.

Nigella Lawson's Apple Latkes from Food Network Magazine December 2010 issue:

1 large egg
1/3 cup plain Greek yogurt plus 1/3 cup more yogurt, milk, or regular plain yogurt (I used 1/3 cup of vanilla Greek yogurt and they were fine)
1 cup all purpose flour
1/2 tsp baking powder
1/4 tsp baking soda
1/2 tsp cinnamon
2 tablespoons sugar
2 apples to make 1 cup of grated apples
vegetable oil for frying
maple syrup, sugar, or cinnamon for serving

Beat egg with 1/3 yogurt and 1/3 milk or yogurt in one bowl.
Whisk flour, sugar, cinnamon, baking powder, and baking soda in another bowl.
Grate the apples to make 1 cup.

Mix the yogurt mixture with the flour mixture, then fold in the apples

Fill a frying pan with 1/4" of oil and heat over medium heat until hot
Dollop spoonfuls into the pan and fry for a minute or two until golden on the underside. Adjust temperature of skillet to not burn
Flip with two metal spatulas and cook on the other side.

Lay on paper towel to drain
Serve plain or with additional toppings

Saturday, January 15, 2011

Spinach Lasagna... Fast and Easy

As part of my after-Christmas de-cluttering extravaganza I have decided to rid my pantry and freezer of items I have been sitting there for months. So this evening, I decided to use things that have been taking up that much needed space to generate ideas for cooking. So what can I do with a half bag of frozen spinach and a jar of pasta sauce? Spinach Lasagna!


Spinach Lasagna

Ingredients:
1 Package (12 oz.) Fresh Egg Lasagna Sheets
2 Cups Ricotta Cheese
3 Cups of your favorite pasta sauce (I used the jar of Newman's Own Roasted Garlic Pasta Sauce I had in my pantry)
1 1/2 Cup Grated Mozzarella Cheese
1 Cup Parmesan Cheese
1 Package (16 oz.) Frozen Spinach, thawed and drained

Directions:
Cover the bottom of a 9" x 13" casserole dish with just enough sauce to cover the bottom. Add one layer of the lasagna sheets. Spread an even layer of the Ricotta Cheese over the sheets. Cover the cheese with some pasta sauce. Sprinkle half of the spinach over the pasta sauce. Spread the grated Parmesan and Mozzarella cheeses over the spinach and top with another layer of Lasagna sheets. Repeat this layering until you get to the topmost layer. Here I left off the spinach. Cover the dish with aluminum foil and bake for 35 minutes at 350°. During the last 5 minutes take off the aluminum foil and let the cheese brown on top. Enjoy with a salad and garlic bread...
Notes: This is by far the easiest recipe that I have cooked in a while. It just requires you to open up some packages and layer ingredients until you are out. I used the fresh lasagna sheets, but you could make your own or buy the dried kind (just remember to pre-cook them). You can also take the liberty of adding whatever sauces and herbs you enjoy in any Italian dish.

Thursday, November 18, 2010

Pull Apart Bread

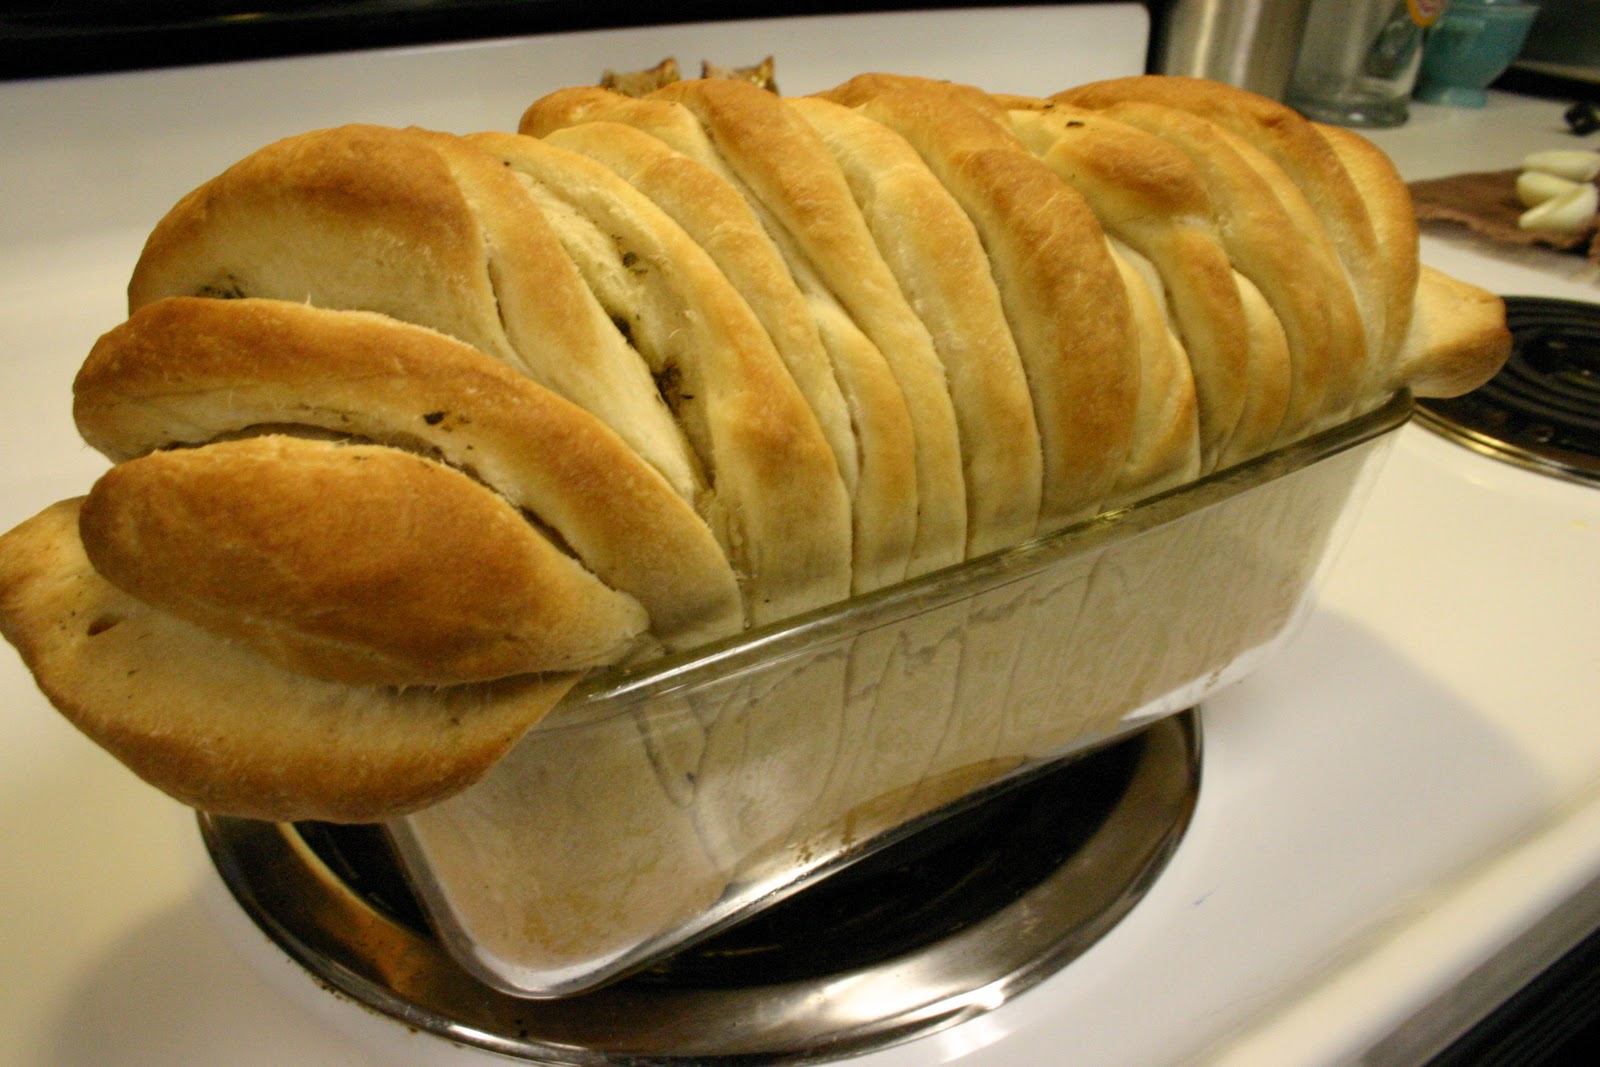
Finally something turned out right! I haven't felt like I've been a very good cook lately, but this bread has brought me enthusiasm for the future of cooking.

I found this recipe through 'The Kitchn' website. Someone wrote in looking for a lost recipe someone else might know. Turns out they found it, and so I decided to try it because it seemed simple. The recipe was taken from the blog 'Dreaming of Pots and Pans'.

I however didn't add the cheese or pepper (and used olive oil on the top instead of milk), because I wanted a plainer bread, and I altered the cook time some. It originally said to cook at 400 degrees for 30 minutes, then lower the temp. I found that this was a little too much heat and reduced it halfway (and it was just right).

I think I'll make this in the future, especially for taking places. The slices pull right apart which means no cutting, and each piece is really moist. It's almost like rolls made into a loaf shape. It also came right out of the loaf pan which means it can just be wrapped up without leaving it in the dish. Plus it looks cool and each slice is unique.


The hardest part was keeping the discs from falling over while stacking them, and then maneuvering all that sideways into the pan. I imagine you could just put them directly sideways into the pan as you make each layer.


My loaf went way outside the pan! Last time I made rolls the yeast was very inactive...but this time it was very active! I felt like it could have been a scene from 'I Love Lucy'


Recipe:

1 packet active yeast (or 2.25 tsp)

1 TBS sugar

1/2 c warm water + 1 cup (divided)
4 c bread flour
1 tsp salt
1 TBS olive oil (for the dough)
1 TBS olive oil (for the cheese and herbs)
1/2 block of cheddar cheese (I used white extra sharp) shredded
2 TBS fresh or dried herbs
1 tsp freshly ground pepper
3 TBS milk (for glazing)
sprinkle of kosher salt 

In a small bowl, whisk together yeast, sugar and 1/2 c warm water and allow to expand (10-15 mins). If your mixture does not foam and expand, the yeast is dead. Throw it out and start over.

Sift together flour and salt then make a well in the bowl. Drizzle in olive oil and yeast mixture then mix well to combine. Slowly add the remaining cup of water as needed until a ball of dough forms.

Turn out on a floured surface and knead for 10 minutes until smooth. Place in an oiled bowl and cover with a damp towel. Allow to rise 30-45 mins for rapid rise yeast, 45-1 hour for regular active.

Punch down slightly and knead again just two or three times. Mix together herbs, cheese, pepper and oil. 

Cut dough in half and cover one half. Roll into a log and make 10 balls from each half. Roll into discs, 3-4 inches in diameter. 


Top each disc with about 1 tsp of cheese filling, brush edges with oil and stack another disc on top. (Or just put each layer directly into the pan sideways if this works better)

Turn your stack sideways and place in a well oiled loaf pan. Cover and allow to rise another 20-30 minutes, or until the dough reaches the sides of the pan. Brush with milk and sprinkle with sea or kosher salt.

Bake 40 minutes total. Bake 20 minutes at 400 degrees (rotate halfway through for even browning), then cover with foil, and reduce heat to 325 degrees for another at 20 minutes until done. Turn out and cool slightly, but it's best eaten when still warm.